经常看到现在许多软件中都使用了平面按钮,即美化了软件的界面,又不乏实用价值,感觉挺不错。其实,在VB中可以简单地制作这类按钮,那么,我们就用VB“堆叠”一个平面按钮吧。
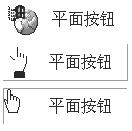
在VB的控件Microsoft Windows Common Controls 6.0中StatuBar可以是平面、凸起、凹下三种状态,可以显示文字和小图片,并可根据你的需要调整它们的位置,我们可以通过检测鼠标位置来改变它的不同的外观──鼠标光标不在按钮区时显示平面状态;鼠标光标在按钮区时显示凸起状态;鼠标按下时显示凹下状态。好,现在我们开始。(
)
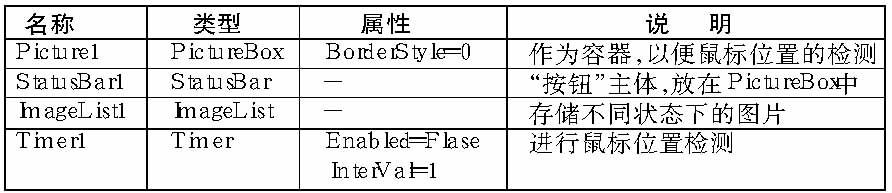
新建一工程,在窗体Form1中添加以下控件:
在窗体代码区添入以下代码:
Option Explicit
'鼠标信息的API函数定义
Private Declare Function ScreenToClient Lib “user32” (ByVal hwnd As Long, lpPoint As POINTAPI) As Long
Private Declare Function GetCursorPos Lib “user32” (lpPoint As POINTAPI) As Long
'鼠标指针类型定义
Private Type POINTAPI
x As Long
y As Long
End Type
Dim Pnt As POINTAPI '用于记录鼠标位置的全局变量
Private Sub Form_Load()
With StatusBar1
'常规状态下为平面
.Panels(1).Bevel = sbrNoBevel
.Panels(1).Text = “平面按钮”
'字及图片的显示位置:sbrLeft图左字左;sbrCenter图左字中;sbrRight图右字右
.Panels(1).Alignment = sbrCenter
'装入常规状态下的按钮图标
.Panels(1).Picture = ImageList1.ListImages(1).Picture
'使StatusBar添满容器Picture
.Width = Picture1.Width
.Height = Picture1.Height + 30
.Top = -30 '消除上方的“边”
.Left = 0
'只使用StatusBar的第一个窗格(
)
.Panels(1).Width = .Width
End With
End Sub
Private Sub StatusBar1_MouseDown(Button As Integer, Shift As Integer, x As Single, y As Single)
'装入在鼠标按下时的图标并显示为凹下的状态
StatusBar1.Panels(1).Picture = ImageList1.ListImages(3).Picture
StatusBar1.Panels(1).Bevel = sbrInset
Timer1.Enabled = False '关闭鼠标位置检测
End Sub
Private Sub StatusBar1_MouseMove(Button As Integer, Shift As Integer, x As Single, y As Single)
'当鼠标首次移入按钮区时,开启鼠标位置检测
If StatusBar1.Panels(1).Bevel = sbrNoBevel Then Timer1.Enabled = True
End Sub
Private Sub StatusBar1_MouseUp(Button As Integer, Shift As Integer, x As Single, y As Single)
'恢复按钮图标并显示为凸起的状态
StatusBar1.Panels(1).Picture = ImageList1.ListImages(2).Picture
StatusBar1.Panels(1).Bevel = sbrRaised
Timer1.Enabled = True
End Sub
Private Sub Timer1_Timer()
GetCursorPos Pnt '得到当前鼠标位置
ScreenToClient Picture1.hwnd, Pnt '转化成相对Picture的相对位置
With StatusBar1
'对鼠标位置是否在按钮区进行检测
If Pnt.x < Picture1.ScaleLeft Or Pnt.y < Picture1.ScaleTop Or Pnt.x > Picture1.ScaleLeft + Picture1.Width /15 Or Pnt.y > Picture1.ScaleTop + Picture1.Height /15 Then
'鼠标离开时恢复按钮状态并关闭检测
.Panels(1).Picture = ImageList1.ListImages(1).Picture
.Panels(1).Bevel = sbrNoBevel
Timer1.Enabled = False
Else
'装入在鼠标移入时的图标并显示为凸起的状态
.Panels(1).Picture = ImageList1.ListImages(2).Picture
.Panels(1).Bevel = sbrRaised
End If
End With
End Sub
程序到此为止,有兴趣的朋友不妨将此写成自己的控件,以后就可以将它当成按钮单独使用了。以上代码在Windows Me/VB 6.0环境下调试通过。